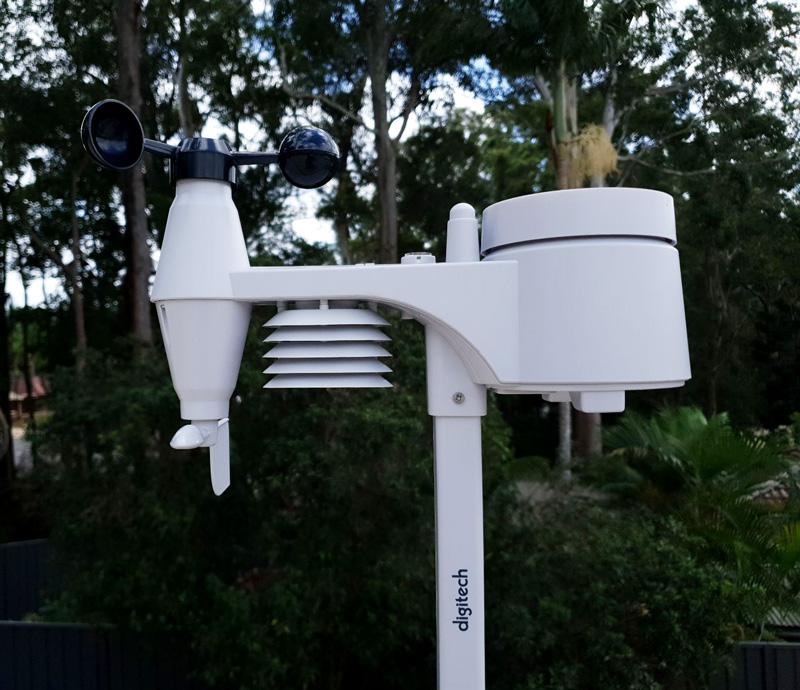
When you first power on the display unit, it will begin searching for sensors. It should find and pair automatically. You will know when the main array is connected because the wind data panel will display data. As for the outdoor temperature and humidity display in the top left, it displays the data from both the main and secondary sensors. By default, it should show the main sensor, however if the secondary is connected first, this may be the displayed data. This can be changed by pressing the 'Channel' button on the back of the display unit. If you push and hold this button, the outdoor temperature section of the display will cycle every four seconds between the 5-in1 sensor and any extra sensors.
If the sensors are not automatically found, or after changing batteries, press the 'sensor/WiFi' button on the back of the display unit, then the reset button(s) on the sensor(s). The reset button for the extra sensor is next to the batteries, while the reset button for the 5-in-1 sensor is underneath near the battery door.
Before you set up any further data on the display unit, you will need accounts for Weather Underground and WeatherCloud if you are going to use them. Read ahead to set these up, then come back to this point and proceed with the setup of the weather station.
When first powered up, the display unit is in 'AP' mode, indicated by the flashing symbol in the middle bottom where the time normally is. This is 'access point' mode and is used for setup. Open the Wi-Fi settings on your phone, tablet, or computer. Where you normally look for networks to connect to, you will see a new entry: PWS-E517F8. Note that there are some grey boxes overlaid in this and the following screenshots. These are to protect the privacy of the person who made this guide! Click the PWS network (it may be necessary to disconnect from another network first) and connect to it.
Once connected, you will, of course, have no internet. Open a web browser, like Chrome, or Firefox, or your phone's inbuilt one, and type in http://192.168.1.1
This will take you to a settings page like this:
WiFi_Connection_Details.jpg
Here, type in the details of the Wi-Fi network you want the weather station to connect to. Next to 'Router', find the network in your home (or wherever you are installing this). Ours is greyed out because this test was done at a private home, but the name of your network and any neighbours nearby should appear. Choose yours.
Next, add your Wi-Fi password, again the one you use at home normally. Then you can add the Wunderground and WeatherCloud details if you are using them, as detailed further on. The Mac address is automatic, but we greyed it out so no one could see ours and find our location with it. That could only ever happen if you publish your MAC address. Click 'Complete', and you're done! Your weather station will disconnect your device from the PSW network, and then connect to the home network you just entered.
Of course, if you are not using the Wi-Fi features, you can skip all of this.
After connecting to the network, your XC0440 display unit should sync to a time server. However, it may not know your location properly, so you will have to change the time zone. Press and hold the button with the clock symbol on the back of the unit, for two seconds. There should be a flashing '00' where the time was. Use the up and down arrow buttons on the back to change your timezone. The numbers are the number of hours different from UTC (universal time) that your time zone is. For the East Coast of Australia, that's 10 hours for normal time, and 11 for daylight saving time, which you often see as 'UTC+10' or 'GMT+10'. For anyone else, your time zone will look like that too, and your phone's settings page should tell you which is yours. You can also change other date and time information here.
You can also change the wind speed display, choosing from Knots, Miles Per Hour, Kilometres Per Hour, or Metres Per Second. Press and hold the 'Wind' button for two seconds, which is the button on the front with symbols that look a bit like music notes and rain drops together. It's on the bottom row of buttons toward the middle right. Then, use the up and down arrow buttons on the back to choose a unit, and press the 'wind' button again to set it.
The instruction booklet contains a lot more settings, but most people won't need them except perhaps for changing the rainfall units. However, comparing our instructions and pictures to the instruction manual should help you figure them out! Now, your XC0440 Weather Station is ready to enjoy!
SETTING UP WEATHER UNDERGROUND
In a new web browser, type in www.wunderground.com, and the home page should appear. In the far right corner, click 'log in', circled here in red.
Wunderground_Homepage.jpg
Of course you cannot log in yet, but the log on screen contains the button to sign up, circled again in red.
On the following screen, enter details including your first name only, the email address you wish to use, and a password according to the rules under the password field. As before, we have covered personal details from our test screen, which used a staff member's real details. When finished, click 'sign up' at the bottom of the screen.
Wunderground_SignUp_2.jpg
Go back to the home page and log in with your new account. Click 'My Profile' at the top right, and select 'My Devices'.
Wunderground_My_Devices.jpg
You will be presented with an empty list. Over to the right, is a blue button marked 'Add New Device'. Click it.
Wunderground_My_Devices_2.jpg
On the new screen that pops up, click the dropdown box and scroll all the way to the bottom to select 'other', then press 'Next'.
Wunderground_New_Device_Other.jpg
Select your location by typing in the property address. We greyed ours out again so we aren't showing the world where our staff member lives, but you will get a map with a pin showing the location, so you can verify, as well as elevation, latitude and longitude, suburb (called 'neighborhood'), and time zone. Click 'Next' if you are happy with the result.
Wunderground_New_Device_Location.jpg
You will now be prompted to 'Tell Us More About Your Device'. You can make up your own name for the first field. Elevation can be found from topographic maps for your area, which in most Australian states are now viewable online for free. There are other free mapping tools too, and Google Earth can also do the job. The 'Device Hardware' must also be set to 'other', 'while surface type' is whatever you are mounting the 5-in-1 sensor near. Ours is on a Colorbond roof, so we chose 'metal'. Height above ground is in feet, so be careful of that one. So is 'elevation', but we forgot to convert that one and had to go back later on . When done, click 'Next'.
Wunderground_New_Device_Details.jpg
Your weather station is now registered with Weather Underground. Record the station ID and Station Key for later use, in setting up the Display unit. You can exit the page now.
Wunderground_New_Device_Registration.jpg
Open a new browser window and type in 'www.weathercloud.net/en' Note the .net rather than .com! Enter a username, your chosen email address, and a password that is made up of letters and numbers only, and click the blue 'sign up' button.
After this, you need to go to your email to find the validation email from WeatherCloud, and click 'Activate My Account'. You will be unable to log in at all until you have done this. When you have, you can log into the WeatherCloud site through the 'get started' tab on the home page.
On the home page are two panels: 'Your Devices' and 'Devices You Follow'. Click 'Create Device'.
The 'Create Device' page asks for a range of details. Name is the name you choose for the weather station. Model should be set to W100 and Link type should be 'Pro Weather Link'. On the right, fill in your location data. For latitude and longitude, use the 'Get Coordinates' button.
WeatherCloud_New_Device.jpg
This brings up a map, which you can zoom in to street level to click your property, and gain the coordinates you need. They will be pre-filled in the form once you click 'done'. Then, you can click the green 'Create' button at the bottom of the device details page.
Go back to 'Your Devices', and click the one you just created. On the right-hand side of the page, towards the top, is a 'settings' button. Click it for a dropdown menu, and click 'Link Device'. As usual, the grey box in the image protects personal data.
WeatherCloud_Link_Device.jpg
This button brings up a dialogue box with the details of your weather station device, for use in the Wi-Fi setup section of the display unit above. Record these details for use later. As usual, we greyed ours to protect privacy.
WeatherCloud_Device_Details.jpg