Motherload Datalogger
Summary
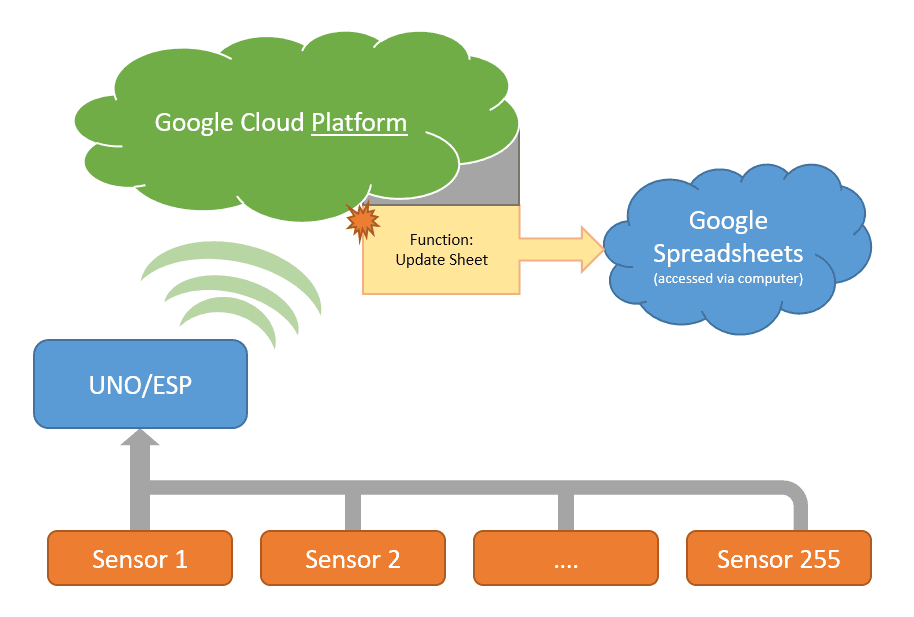
The Master Datalogger Project, with Google Cloud Platform! Connect any sensor to the XC4411 Uno with WiFi board, and log that data automatically to Google Sheets, with an SD card backup and Real Time Clock.
Table of Contents
If you've tried using google sheets or a few other web-services in a project before, you'll notice that there's issues to do with logging into the service if it uses things like OAuth2 or other authentication methods.
This method outlined below makes it a simple task, as we set up what is called
cloud functions
to activate and assign data to the google sheet on our behalf.
Here, we set a simple cloud function that is triggered by a web url, then you tell the ESP to upload data to that url, which in turn, goes through the cloud function to append data to the google sheet.
In essence, the cloud function looks like this:
1function main(urlData) { google .auth() .then(function() { //data from ESP when sent to this function api.spreadsheets.values.append( //add it to the spreadsheet { spreadsheetId: ' ... ', values: urlData, }, ); }) .then(message => { respond.status(200).send(message); //if everything is all right, return HTTP 200 }) .catch(errorMessage => { respond.status(404).send(errorMessage); // else, send HTTP 404 });}
It might look like a foreign concept to you if you've never really dealt with anything like this before, but we'll walk through it step by step.
Note that while Google Cloud Platform is a
paid service
, this tutorial will use free credits and will be in the free tier of the Google Cloud Platform. As of January 2020, the pricing is:
Cloud Functions:
2 Million invocations a month for free
\$300 Credit for 1 year when you first sign up
This means you can upload 2 Million times in one month before you start to get charged for your use of a service.This could change at any point and is not managed by us, so your best bet is to look at the following links to ensure that you're still within the free limits.
Jaycar does not hold any responsibility for costs occurred by using the Google Cloud Platform (abbreviated as GCP). You are responsible for managing your costs and ensuring you are within the free limits, and by continuing with this tutorial you agree to be responsible for costs occurred.
Quick maths indicate uploading
every second
of
every day
will blow over the 2 million limit (2,500,000 invocations), so our code is set to upload data once a minute by default and we recommend that you don't reduce that without being sure of what you're doing.
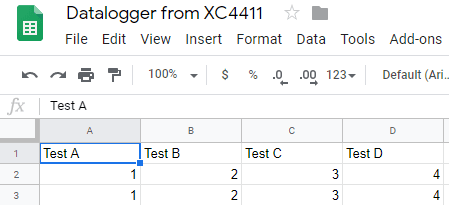
This section will assume you have already created a google spreadsheet to store data, If you haven't, head to
and make a spreadsheet; You can put anything you want in this sheet; for simplicity, we will fill in the top row and simply append future data to the sheet.
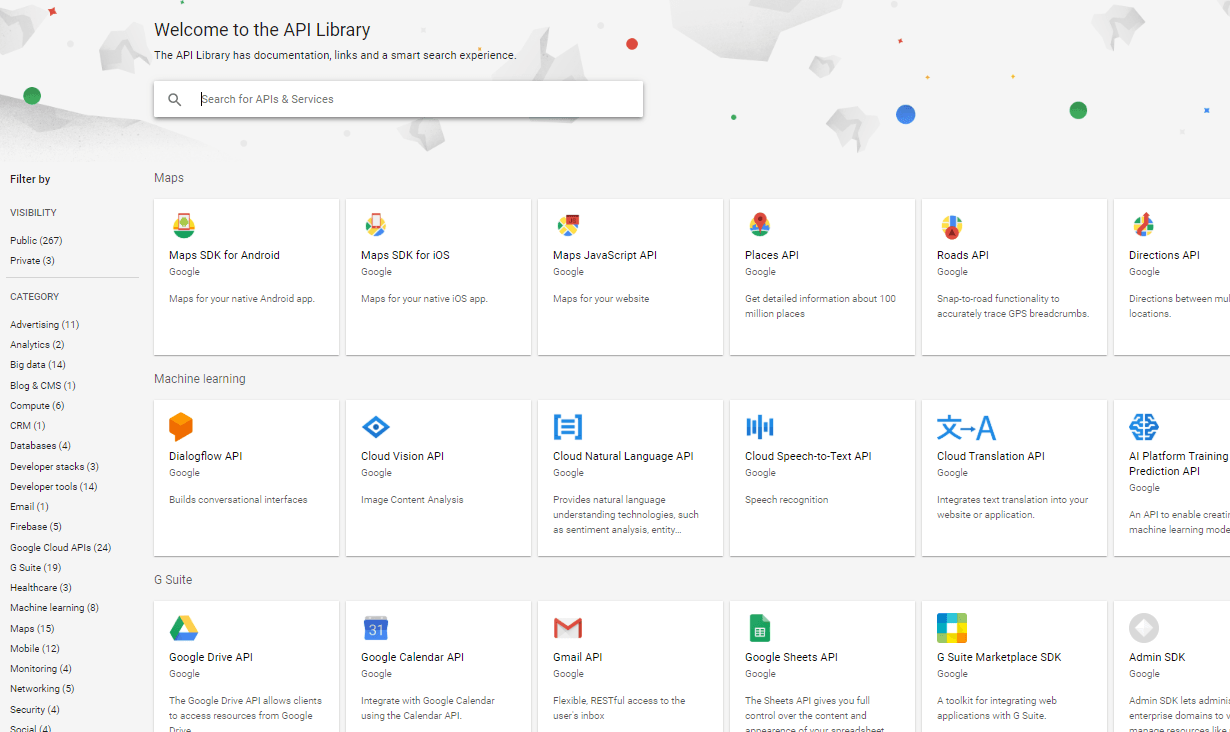
First step is to head over to
and setting up your first project.
Each function and service on GCP must be tied to a
project
, this keeps all the resources that you use together so that you can easily tie multiple services together and not worry about one project's services utilising another.
For this tutorial, we will call our project "datalogger" but you can call it whatever. It might take a short while for the project to be created when you first make it, so go make a cup of tea and some toast while you wait. It should appear near the top of the page, next to "Google Cloud Platform" once it has loaded.
Next up we're going to make a cloud function to add data to our spreadsheet, which is triggered by a url.
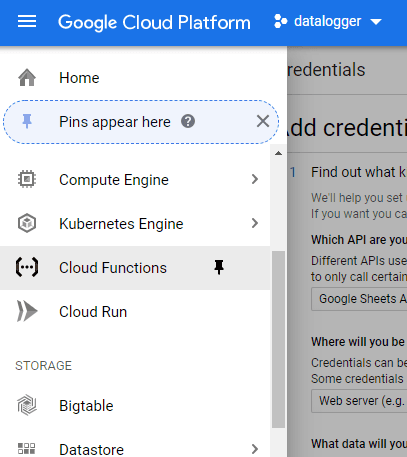
Find "Cloud Functions" in the side menu, you can pin it to the top of the list to make it easier to find next time.
If you don't have a function it should present you with one button saying "create function" which you can click to bring you to this page:

We've split the image and put it side by side so that you can see all what's going on:
Name the function something descriptive, without spaces. We've gone with logData as that is what the function will do.
Memory Allocated: This function really doesn't need much, so go with 128MB. if you're expecting to send more data, bump this up.
Trigger: we want to trigger with a HTTP request, which the URL is presented below (save this to put in the ESP later).
Source code: you can just use the inline editor
Runtime: We are using NodeJS for the code samples below, but you can also write python or go code if you want.
Function to execute
: In this function we called it "main" as denoted by the "exports" in code. change this to be main
Then copy and paste the below code for
index.js
1const { google } = require('googleapis');function append(api, data) { return new Promise((resolve, reject) => { api.spreadsheets.values.append( { spreadsheetId: process.env.SHEET, range: 'A1:Z1', insertDataOption: 'INSERT_ROWS', valueInputOption: 'USER_ENTERED', resource: { values: [data], }, }, function(err, response) { if (err) { reject(err); return; } resolve(response); return; }, ); });}exports.main = (req, res) => { google.auth .getClient({ scopes: ['https://www.googleapis.com/auth/spreadsheets'], }) .then(auth => { const api = google.sheets({ version: 'v4', auth }); append(api, req.query.data || req.body.data || ['no', 'data', 'sent']) .then(e => { res.status(200).send(JSON.stringify(e, null, 2)); }) .catch(err => { res.status(404).send(JSON.stringify(err, null, 2)); }); });};
And copy and paste the below code for
package.json
1{ "name": "sample-http", "version": "0.0.1", "dependencies": { "googleapis": "^40.0.0" }}
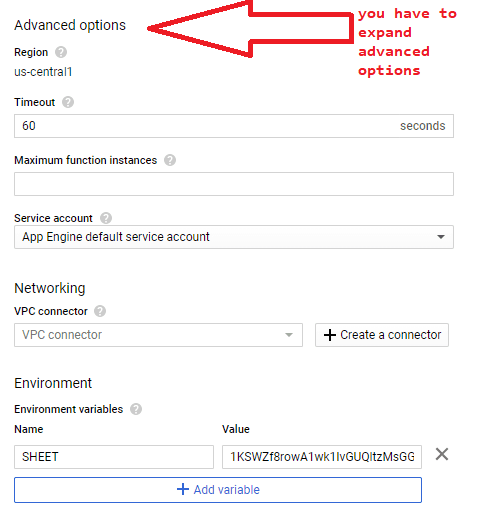
Next up is important
: expand the "Advanced options" or "environmental variables, networking, timeouts and more" line. This allows you to set up different variables, where we will put our sheet ID.
You should see "Environmental Variables" - add an variable named "SHEET" containing your google Sheets ID, similar to below:
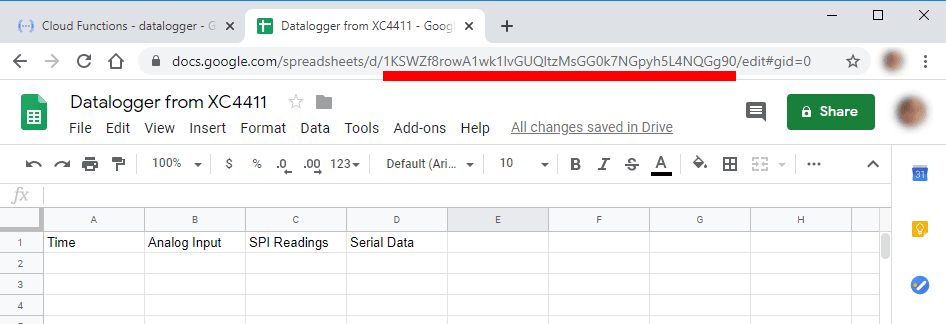
This is the sheet ID that you have copied from google sheets. Open up the google sheets in a new tab and copy the sheet id, like from below (underlined in red).
This is so that the function knows what sheet to access and add data to
(This is the sheet you will "share" with the service worker later)
.
Then press
Create
back on the cloud function, and give it a a little while to deploy successfully. You should come to a screen like what is presented here:
(Note: we've cropped our image to make it fit on this page.)
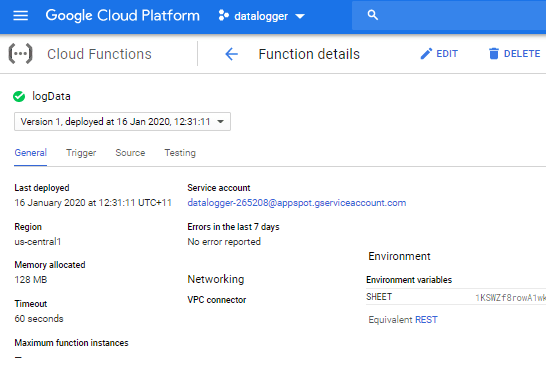
Two things to note here:
Service worker: This is the "google account" that acts on behalf of the function, we'll use this soon.
Trigger tab: this shows you the URL used to trigger the function.
Copy the service account address, and head back to google sheets.
Make sure you're on the same google sheet that you want to log data to, and click the Share button in the top right.
Paste the service account email address to the share link, and make sure that the permission is set to "Can Edit"
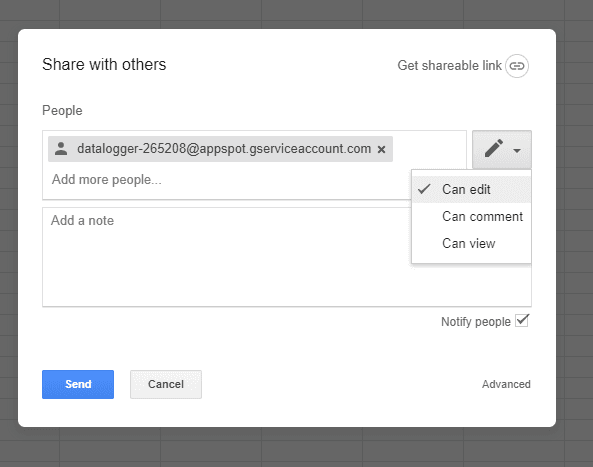
What we're doing here, is allowing the "function's account" or the function to act on behalf of the service account, to add data (edit) the google sheet.. It is sort of like "sharing" your google sheet with a friend, however this friend is just a robot that operates on the google cloud functions.
Head back to your Google Cloud Function, and click on the "Trigger" tab. You can see a URL which is the http end point to trigger this function. Try opening it in a new tab, you will find that it will contain a lot of random unorganised data; and your google sheets will be updated with "No Data Sent"
Copy this Trigger URL, we will place it in the ESP code shortly.
There's two parts of code that you need to change for the esp code, found in src/espCode/espCode.ino:
WiFi connection details
Target URL, which is found from the
Function Properties
as above.

Note:
We are using an insecure version of https, as in: we ask for https but we don't verify what we're connecting with. This is insecure but easier to deal with.
Change the code to reflect your details and upload onto the ESP portion of the
.
If you've never used any ESP8266 device before, read the below section for a quick run-down on how to program.
If this is your first ESP8266 project ( products include
and
, among others) then you need to set up Arduino to work with ESP8266. Start by getting the manual of the
and install the board through the Boards manager.
Once they are installed, to program the
ESP, change the Board type to Generic ESP8266 and change the dip-switches on the board so that 5,6, and 7 are ON with all others off. When uploading, you might get to a point where it will output a string like ....______......____ - Press the reset button on the board to reboot it and program correctly.
When programming the arduino portion, change the dip-switches so that 3 and 4 are ON with 1,2,5,6, and 7 are OFF. Once both halves are programmed, you connect the two by turning all switches off and setting 1 and 2 to ON. For more information or a smaller trial program to try, use the software and manual on the
product page.
Once the ESPCode is uploaded, you can turn dip-switch 7 OFF and open up the
Serial Monitor
. Set to the correct baud speed (default: 115200) and reset the device. You should see that it has connected to the WiFi network, and if you type in something such as:
1[1, 2, "This is a string", 4]
Note that you are typing this into the serial monitor.
You will find this information has been uploaded onto your google spreadsheet. This means we're half-way there, and what's more is that it's a very simple process which might be starting to make sense to you; The ESP gets the serial data, and sends it to the URL; The Google Cloud function we made before then takes the data and adds it to your google sheet, as the service worker user, just as if someone else has added that data.
Note, this is JSON data, so it must be properly formatted. In our code, we use the brilliant
library to parse everything correctly, but in the serial monitor you must format it yourself.
Next up we'll discuss how to put the shield together. This shield has both an SD card slot and an RTC, which the code is provided in the src/samples folder. If you would like to use those parts of the shield, copy and paste from the relative example code.
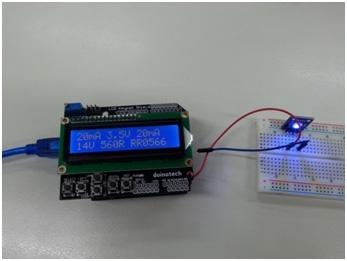
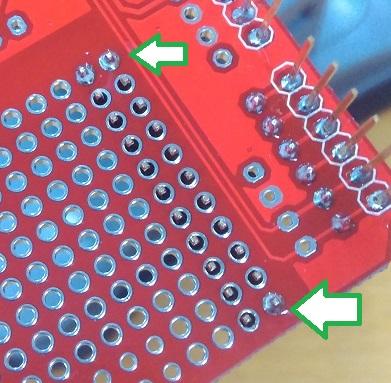
We're going to add some header pins to the datalogging shield so it is easier to plug in sensors.
First, trim off the amount of header pins that you want. We are going to make 2 rows of 11, which will act as our power rails, close to the A0 - A5 analogue pins. This is for analogue modules that usually have the 3-cable connections (5V, GND, Signal).
Start by placing one row, and tack it in place at either end of the row.
then trim off a section of the
solid core wire to be roughly the size of the row, with one end stripped, so that it can be soldered to one of the side tacks.
.jpg%3Fbranch%3Dprod&w=1920&q=75)
From here, you should be able to pull off the rest of the insulation to expose the bare wire. You can then trim this to size if needed, and press it up against the pins of the header row so that it sits touching the header pins.
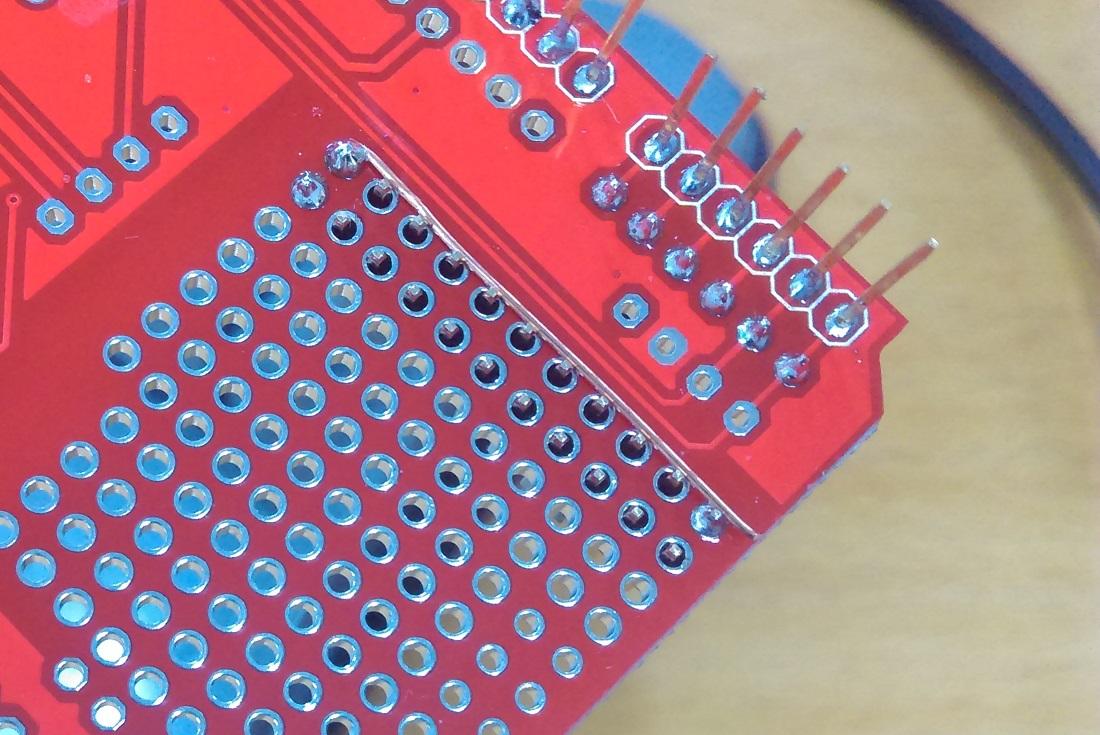
From here, you can go along and solder the rest of the pins to the copper wire and make a nice solid connection.

Do this for both sides of the row, then use some more
to solder these rows on to the 5V and GND connections. The goal here is to be neat and to leave room for future improvements if needed.
The analogue header row can be soldered in as normal, as each of the solder pads will already connect to the underlying arduino pins.
Set dip-switches 3 & 4 to be ON and ensure the ESP switches (5,6,7) are turned OFF, then modify and upload the code found in src/unoCode/unoCode.ino
Our code already includes the latest version of ArduinoJson, so sending data becomes a breeze between the two modules.
1void setup(){ Serial.begin(115200); // ... etc}void loop(){ // get sensor reading, from A0 for instance: long value = analogRead(A0); //Build a JSON document, add the data, and send it. StaticJsonDocument<100> doc; doc.add(value); doc.add("some other values"); doc.add( (float) 3.141527 ); //whatever values you want, but be sure to have the correct type. //calling serializeJson will send it over the Serial connection serializeJson(doc, Serial); delay(60 * 1000); // delay 60 seconds so we don't upload too much data.}2
Be sure to set the correct data type that you want to read from the sensor, and do any calculations before you finally add the data to the doc and send it.
For instance, if you wanted to calculate the average over the minute, or over 5 samples, or etc, you could do:
1long sum = 0;// average over 5 samples:for(int i = 0; i < 5; i++){ sum += analogRead(A0); //add a reading to the total "sum" delay(1000); // wait 1 second between samples;}float average = sum / 5;// ...doc.add(average); //the data type is "float" so it will use decimal points.// ... send it, and wait before sending more.2
Check with the
Serial Monitor
that the data comes in correctly formatted, on the same
Baud
as the ESP code portion (default: 115200). You should get readings in the form of [1,2.00,43] which is similar to what we tested with the ESP code above.
Here, the UNO is
sending
the data, and the ESP
receives
the data to upload to the cloud function.
Change dip-switches 1 and 2 to ON with all other dip-switches as OFF and reboot the device. With any luck, after a minute or two have passed you should be left with some data in your spreadsheet, corresponding to the data your arduino has sent
If you would like to use the RTC to log time, upload the src/samples/setRTC.ino code onto the UNO portion of
. You should see the serial monitor display "OK"and give you the current time as shown on your computer. Once that is done, you can simply add the RTC code to the above code sample.
We did not include it in the pre-programmed example as many datalogging shields are uninitialised and could cause hiccups for newcomers. Feel free to experiment in a "one way works for all" method and we could consider adding your code into the repository! :cheers:
We've really intended this project to be as open ended as possible. Data can be copied to the SD card for backup, and the time from the RTC can be reported.
We hope you like this project and we're excited with any changes you guys might like to contribute, so be sure to check out the github page (link near the top of this page.) - plus if there's any issues you guys find or some further clarification needed, submit it on the
issues
tab of the github page.
Google Cloud Functions really extend what is possible with these types of IoT projects and with enough elbow-grease you can do almost anything.
One idea is to upload GPS co-ordinates, which can send a link to google maps to your phone or email on those co-ordinates. doing something would be as simple as sending latitude and longitude data to your cloud function, then using the MAPS api to generate maps.
Have a look at some of the other apis and find a way to connect the API to new google cloud functions to be triggered by a HTTP request.
The following links are not an endorsement nor have any guarantee of quality in terms of suitability for this project, but we hope they are useful for you in your maker journey.
Similar projects you may be interested in