Arcade Joystick
Summary
There's a lot of arcade emulators out there that can run on many computers including the Raspberry Pi so it only makes sense to play these emulators on some authentic hardware. Here we'll show you how to build an arcade style joystick using our new Arcade Pushbuttons and Arcade Joystick. We've got a Leonardo main board to emulate a USB keyboard so it can be used with any software that you can play with a keyboard. Just like any other Arduino design, it can of course be customised to more buttons or even mapped to different keys. We've built ours in an ABS enclosure for portability but there's no reason you couldn't mount the controls directly to an arcade cabinet or even a coffee table.
Materials Required
| 1 | Duinotech Leonardo r3 Main Board | XC4430 |
| 1 | Arcade Joystick with Microswitches | SM1052 |
| 4 | Red Arcade Button Switch with LED Illumination | SP0662 |
| 1 | 150mm Plug to Plug Jumper Leads - 40 Piece | WC6024 |
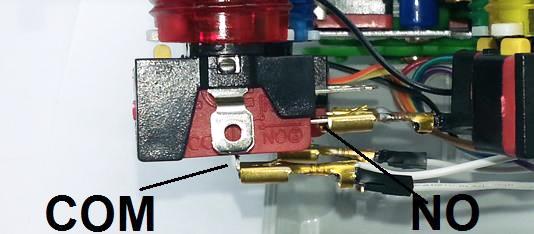
| 2 | 6.3mm Non-Insulated Spade Connectors Pk 10 | PT4630 |
| 1 | Sealed Polycarbonate Enclosure 171 x 121 x 55 - Clear Lid | HB6248 |
Table of Contents

Similar projects you may be interested in
.jpg%3Fbranch%3Dprod&w=1080&q=75)
.png%3Fbranch%3Dprod&w=1080&q=75)